It’s now almost a year after the world saw the first stable release of Magento, and there was still no “definitive guide” to Magento SEO. A lot has been written on the subject, in the Magento forum and some blog posts, but nothing that gives a complete overview of this subject. It’s time to let all this knowledge and experience fall into one big piece; the definitive guide to Magento SEO.
As search, SEO, and last but not least the Magento platform evolve, we will keep this Magento SEO article up to date with tips, tricks & best practices. Because Magento, though pretty stable, hasn’t matured yet, the best practice is to stay updated with the latest release, at moment of writing 1.4.
Need your website reviewed?
If you need an outside look at your Magento install, you might consider our Website Review. The results of this review contain a full report of improvements for your site, encompassing my findings for improvements in different key areas such as SEO to Usability to Site Speed & more. For the cost of €595 (which is less than $800), you’ll receive a report that represents a much larger value in turn-over and profit!
Table of contents
- 1 Basic technical optimization
- 1.1 General Configuration
- 1.2 Header Settings
- 1.3 CMS Pages
- 1.4 Category optimization
- 1.5 Products optimization
- 2 Magento Template Optimization
- 2.1 Optimized Blank Template
- 2.2 Headings
- 2.3 Clean up your code
- 2.4 Aim for speed
- 3 Advanced Magento SEO and Duplicate Content
- 3.1 Nofollowing unnecessary links
- 3.2 Canonical URLs
- 3.3 XML Sitemaps
1 Basic technical optimization
1.1 General Configuration
Magento is one of the most search engine friendly e-commerce platforms straight out of the box, but there are several known issues that can be taken care of to optimize your Magento SEO. The first step is to get the most recent release, 1.2.1 Then, to get started, enable Server URL rewrites. You will find this setting under System => Configuration => Web => Search Engines Optimization. Another good thing to configure now you are on this screen is “Add store Code to Urls” under “Url Options”. In most cases it is better to set this functionality to “No”.
WWW vs non-WWW
Under “Unsecure” and “Secure” you can find the Base URL, where you can set the preferred domain. You can choose between the www and the non-www version of the URL. With changing the setting you don’t create a redirect from www to non-www or non-www to www but set only the preferred one. Therefore it is a good idea to create a 301 redirect through .htaccess with mod_rewrite. Besides solving the WWW vs non-WWW problem this redirect prevents Magento from adding the SID query to your URLs, like ?SID=b9c95150f7f70d6e77ad070259afa15d. Make sure the Base URL is the same as redirect. When editing the .htaccess file you can add the following code to redirectindex.php to root.
Around line 119:
1 | RewriteBase / RewriteCond %{THE_REQUEST} ^[A-Z]{3,9} /index.php HTTP/ |
2 | RewriteRule ^index.php$ http://www.mydomain.com/ [R=301,L] |
Or, when your Magento install is not in the root but in the sub-directoryhttp://www.mydomain.com/magento/:
1 | RewriteBase /magento/ RewriteCond %{THE_REQUEST} ^[A-Z]{3,9} /magento/index.php HTTP/ |
2 | RewriteRule ^index.php$ http://www.mydomain.com/magento/ [R=301,L] |
By default your Magento install has the title “Magento Commerce”. For your Magento shop to get the traffic it deserves you should keep at your mind:
- Search engines put more weight on the early words, so if your keywords are near the start of the page title you are more likely to rank well.
- People scanning result pages see the early words first. If your keywords are at the start of your listing your page is more likely to get clicked on.
First of all you should get rid off the default title “Magento Commerce”. Go to Configuration => Design => HTML Head. Choose a good and descriptive title for your website. This title will be used for several non-content pages without custom title, e.g. “Contact Us” and the “Popular Search Terms”.
To add your store name to all page titles, including categories and products, put your store name in “Title Suffix”. It is a better idea to keep the Prefix empty, for the reasons mentioned above. Also keep “Default Description” and “Default Keywords” empty. For a non-production environment, to prevent indexing of the site, it may be useful to set “Default Robots” to “NOINDEX, NOFOLLOW” but for all other applications make sure it is set to “INDEX, FOLLOW”.
Now we are optimizing the <head> of your web-store pages it is a good idea to add the new canonical tag. You can install the Canonical URL’s for Magento Module to add them to your head and improve your Magento SEO.
For some reason Magento turns non-set meta robots into a meta tag in this style:
<meta name="robots" content="*" /> |
This can result in some very strange behavior in the search engines, so we’ll remove it.
1.3 CMS Pages
At first sight Magento may lack some descent CMS functionality, but for most uses it will be flexible and powerful enough. One of the benefits of this simple CMS is that you can control each aspect of the pages. Once you’ve given each CMS page some decent content, pick a SEF URL Identifier and page title, (while keeping in mind the points under 1.2), and go to the Meta Data tab to write a description for each CMS page that you actually want to rank with.
You can keep the “Keywords” empty. The description has one very important function: enticing people to click, so make sure it states what’s in the page they’re clicking towards, and that it gets their attention. Thus, the only well written description is a hand written one, and if you’re thinking of auto generating the meta description, you might as well not do anything and let the search engine control the snippet…
If you don’t use the meta description, the search engine will find the keyword searched for in your document, and automatically pick a string around that, which gives you a bolded word or two in the results page.
1.4 Category optimization
Magento gives you the ability to add the name of categories to path for product URL’s. Because Magento doesn’t support this functionality very well – it creates duplicate content issues – it is a very good idea to disable this. To do this, go to System => Configuration => Catalog => Search Engine Optimization and set “Use categories path for product URL’s to “no”.
Now it’s time to set the details for each category. Go to Catalog => Manage Categories. The most important fields are:
- Meta Description: put an attractive description here; Keep in mind that people will see the description in the result listings of search engines.
- Page Title: keep this empty to use the category name including parents categories. When you customize it, the title will be exactly like your input, without the parent category.
- URL Key: try to keep a short but keyword rich URL. Removing stop words like “the”, “and”, “for” etc. is usually a good idea. Also note that you can set this only for all store views, for a multi-language store you should keep it language independent.
For each store view you can specify the Name, Description, Page Title and Meta data. For multi-language stores this is really a great feature.
1.5 Products optimization
Optimization of the Products pages is similar to Categories. You can set the Meta Information for the “Default Values” and for each “Store View”. Note that for the “Meta Title”, this will overwrite the complete page title, including categories but except title prefix/suffix, and not just the product name.
An often-overlooked aspect of Magento SEO is how you handle your images. By for instance writing good alt tags for images and thinking of how you name the image files, you can get a nice bit of extra traffic from the different image search engines. Next to that, you’re helping out your lesser able readers who check out your site in a screen reader, to make sense of what’s otherwise hidden to them.
By default the images will be renamed to the product title, the same for titles and alt tags. With some extra effort you can set the titles and alt tags for each product image. Under the tab “Images” of the Product Information you can set the label for each product image, this value will be used for the alt and title tag. Of course you can do this for each specified Store View as well.
2 Magento Template Optimization
2.1 Optimized Blank Template
The default Magento skins like “Default Theme”, “Blue Skin” and “Modern Theme” don’t do a very good job in the use of headings, so from an SEO perspective, there is a lot of room for improvement there. To make it easy on you, we have developed a
MS cosmetics theme and
Ms fashion2 theme,
Ms premium theme which incorporates all the things we’ve outlined below.
2.2 Headings
By default the logo is an <h1>, which is should only be on the front page, and on all other pages it should be no more than an <h3>. The most important thing is to get the title of the content in an <h1> tag, e.g. for a category page should it be the category name and for a product the product name.
The next step is to clean up the over usage of headings. It’s a good idea to get rid off the header usage in the side columns, or make the text relevant to the shop (ie. include keywords). There is no reason to add “static” and keyword less titles with an <h4>. It is, for instance, better to change all the <h4> tags in <div class="head"> to <strong>tags. Now it is time to optimize your content, at the category pages put the product names in a <h3> and the category name in a <h1>. On product pages, you should put the product name in an <h1>.
2.3 Clean up your code
All that javascript and CSS you might have in your template files, move that to external javascripts and css files, and keep your templates clean, as they’re not doing your Magento SEO any good. This makes sure your users can cache those files on first load, and search engines don’t have to download them most of the time.
2.4 Aim for speed
A very important factor in how many pages a search engine will spider on your shop each day, is how speedy your shop loads.
You can do two things to increase the speed of your Magento install:
- Enable caching. Go to System => Cache Management and enable all caching features, like this.
- The importance of a good host and server config. With MySQL and PHP opcode cache you can improve the speed of Magento dramatically.
NOTE: there is a rumor that with the 1.3 release of Magento new functionality will be added with huge performance improvements.
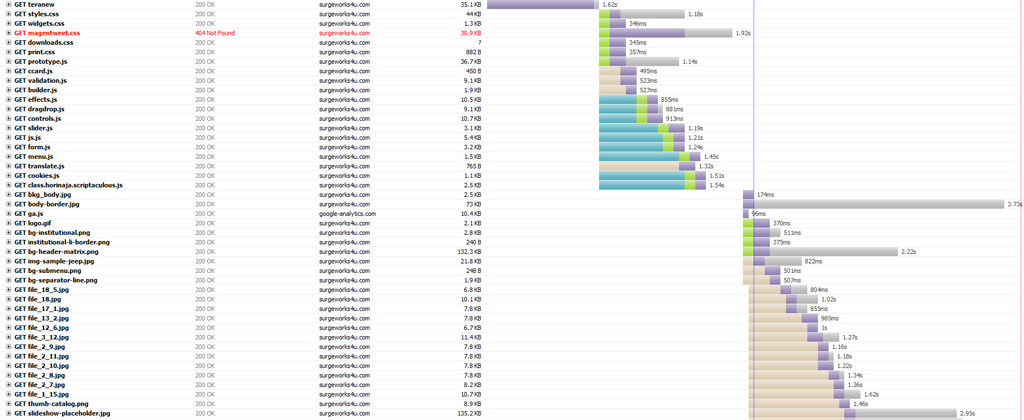
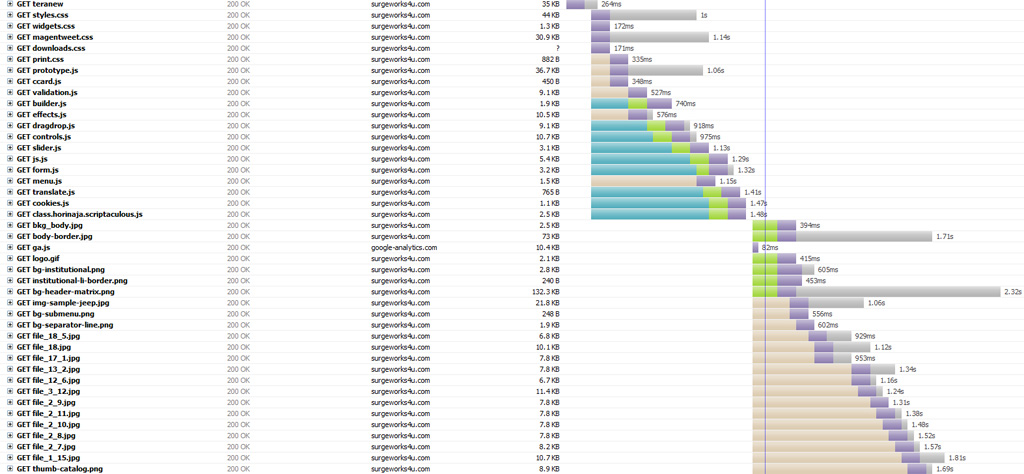
Another thing to look for is the number of external files. For each file you make people download, their browser has to create another connection to the webserver. So it is a very good idea to reduce the number of external files and combine several external files in to one. By default Magento already combines (almost) all javascript files into one file.
It doesn’t do this for stylesheets though: the default template has 6 different stylesheet files. You can combine the content of these stylesheets into one new one, except for the print.css file, or you can use the Fooman Speedster module. Besides combining files, this module also compresses and caches your javascript and stylesheet files. (Please note the requirements for Speedster: mod_rewrite has to be enabled & and your server needs to have .htaccess support. If you use Canonical URLs for Magento and Fooman Speedster together, you need to overwrite the Canonical module.
3 Advanced Magento SEO and Duplicate Content
Once you have done all the basic stuff you will find the rest of the problems amount to one simple thing: duplicate content. Loads of it in fact. For products you have, at least, the following URLs with exact the same content:
- domain.com/product.html
- domain.com/category1/product.html
- domain.com/catalog/product/view/id/1/
- domain.com/catalog/product/view/id/1/category/1/
Besides that you have pages like the product review pages with almost the same content. Another problem are categories, you get a load of duplicate content with layered navigation and the sorting options. In essence that means that, worst case scenario, a product is available on 4 pages at least next to the page where it should be available.
We’re going to get rid of all those duplicate content pools, by still allowing them to be spidered but not indexed and fixing the sorting options and layered navigation for categories.
3.1 Nofollowing unnecessary links
Another easy step to increase your Magento SEO is to stop linking to your login, checkout, wishlist, and all other non-content pages. The same goes for your RSS feeds, layered navigation, add to wishlist, add to compare etc. Still there is no plugin for Magento to work this around. You had probably have to go into your template files to add nofollow to those links by hand.
3.2 Canonical URLs
To help search engines to understand the duplicate content of your pages you can suggest the preferred version of the URL for each page, using the new canonical URL tag, so you should install the Canonical URL’s for Magento module.
3.3 XML Sitemaps
XML Sitemaps are an easy way of letting search engines know where your content is, it won’t help you rank, but it might help you get indexed faster. You can create an XML sitemap manually by going to Catalog => Google Sitemap => Add Sitemap, choosing a filename, path and store view, and then pressing “Save & Generate”.
You can then simply put the following code in your robots.txt file to point the search engines to your sitemap.xml file:
Sitemap: http://domain.com/sitemap.xml |
As your inventory changes, you’ll have to re-generate XML sitemaps. To make sure they’re up to date, the best way is to set up a cron job.
Conclusion: Magento SEO development
This article has covered all the aspects of Magento SEO, if you have any feedback, or additions, let us know, so we can keep improving on this article. We’re working closely with the Magento core development team to improve the SEO aspects of Magento, so we’re actively trying to get some of the ideas in this article into Magento core.